Android编译系统分析之几个关键点(三)

Android 编译系统解析系列文档

编译系统入口envsetup.sh解析

解析lunch的执行过程以及make执行过程中include文件的顺序

关注一些make执行过程中的几个关键点

对一些独特的语法结构进行解析


这篇文章的主要内容我们来分析关于模块配置文件Android.mk加载的一些关键的知识点

躲不开的背景知识”mm”与”mmm”

在分析模块配置文件Android.mk文件的加载过程之前,我们需要先了解一段背景知识,那就是Android.mk的使用情景是什么样的?

还记得我们在前边分析lunch的时候提到的源码的全编与模块编译吗?

控制全编与模块编译的命令就在envsetup.sh文件中定义,其中全编直接运行make,模块单编需要用到mm与mmm两条命令,定义如下

1
2
3
4
5
6
7
8
9
10
11
12
13
14
15
16
17
18
19
20
21
22
23
24
25
26
27
28
29
30
31
32
33
34
35
36
37
38
39
40
41
42
43
44
45
46
47
48
49
50
51
52
53
54
55
function findmakefile()
{
TOPFILE=build/core/envsetup.mk
local HERE=$PWD
T=
while [ \( ! \( -f $TOPFILE \) \) -a \( $PWD != "/" \) ]; do
T=`PWD= /bin/pwd`
if [ -f "$T/Android.mk" ]; then
echo $T/Android.mk
\cd $HERE
return
fi
\cd ..
done
\cd $HERE
}

function mm()
{
local T=$(gettop)
local DRV=$(getdriver $T)
# If we're sitting in the root of the build tree, just do a
# normal make.
if [ -f build/core/envsetup.mk -a -f Makefile ]; then
$DRV make $@
else
# Find the closest Android.mk file.
local M=$(findmakefile)
local MODULES=
local GET_INSTALL_PATH=
local ARGS=
# Remove the path to top as the makefilepath needs to be relative
local M=`echo $M|sed 's:'$T'/::'`
if [ ! "$T" ]; then
echo "Couldn't locate the top of the tree. Try setting TOP."
elif [ ! "$M" ]; then
echo "Couldn't locate a makefile from the current directory."
else
for ARG in $@; do
case $ARG in
GET-INSTALL-PATH) GET_INSTALL_PATH=$ARG;;
esac
done
if [ -n "$GET_INSTALL_PATH" ]; then
MODULES=
ARGS=GET-INSTALL-PATH
else
MODULES=all_modules
ARGS=$@
fi
ONE_SHOT_MAKEFILE=$M $DRV make -C $T -f build/core/main.mk $MODULES $ARGS
fi
fi
}

先看mm命令,如果运行这条命令的路径为TOP目录,那么就等价于直接使用make命令
如果不是,我们就以当前目录为基点,递归向上查找距离最近的Android.mk文件,这个查找的过程在findmakefile()函数中定义

Android编译系统在使用mm命令的时候为我们提供了一个参数,可以方便我们打印出所要编译模块的最终安装路径,这个参数就是GET-INSTALL-PATH

  • 如果编译系统在检查到正在使用mm时加了这个参数,我们就不执行编译的操作,只打印这个参数的值

这个逻辑的实现其实只是将GET-INSTALL-PATH定义为了一个target,我们使用mm时,会将这个target传进去,从而调用到这个target定义的命令,我们后边遇到模块解析代码的时候就会看到这个target相关代码

  • 如果没有这个参数,我们就指定编译全部的模块(all_modules),然后将mm后边的参数全部作为MAKEGOALS传入

以上就是mm执行的全部过程,有三点需要注意:

  • $DRV,这个变量的作用是加一些静态分析的选项以及路径
  • ARG参数的添加可以让我们使用-B这样的make自带的参数
  • ONE_SHOT_MAKEFILE是区别全编与模块编译的关键变量

对于mmm函数,使用方法为直接指定Android.mk所在的文件夹,除此之外最终调用的命令与mm是一样的,有兴趣的读者可以自己来试着解析

了解了使用方法之后,mm在调用的时候会传入ONE_SHOT_MAKEFILE参数,这个参数是区别全编和模块编译的重点,接下来我们来具体看看这个参数带来的实质的影响

模块文件加载解析过程

如果读过我之前make解析文章的同学一定还记得include的顺序,没错,Android.mk文件的解析的主要代码是在build/core/main.mk文件中,附代码如下:

1
2
3
4
5
6
7
8
9
10
11
12
13
14
15
16
17
18
19
20
21
22
23
24
25
26
27
28
29
30
31
32
33
34
35
36
37
38
39
40
41
42
43
44
45
46
47
48
49
50
51
52
53
# Before we go and include all of the module makefiles, stash away
# the PRODUCT_* values so that later we can verify they are not modified.
stash_product_vars:=true
ifeq ($(stash_product_vars),true)
$(call stash-product-vars, __STASHED)
endif

ifneq ($(ONE_SHOT_MAKEFILE),)
# We've probably been invoked by the "mm" shell function
# with a subdirectory's makefile.
include $(ONE_SHOT_MAKEFILE)
# Change CUSTOM_MODULES to include only modules that were
# defined by this makefile; this will install all of those
# modules as a side-effect. Do this after including ONE_SHOT_MAKEFILE
# so that the modules will be installed in the same place they
# would have been with a normal make.
CUSTOM_MODULES := $(sort $(call get-tagged-modules,$(ALL_MODULE_TAGS)))
FULL_BUILD :=
# Stub out the notice targets, which probably aren't defined
# when using ONE_SHOT_MAKEFILE.
NOTICE-HOST-%: ;
NOTICE-TARGET-%: ;

# A helper goal printing out install paths
.PHONY: GET-INSTALL-PATH
GET-INSTALL-PATH:
@$(foreach m, $(ALL_MODULES), $(if $(ALL_MODULES.$(m).INSTALLED), \
echo 'INSTALL-PATH: $(m) $(ALL_MODULES.$(m).INSTALLED)';))

else # ONE_SHOT_MAKEFILE

ifneq ($(dont_bother),true)
#
# Include all of the makefiles in the system
#

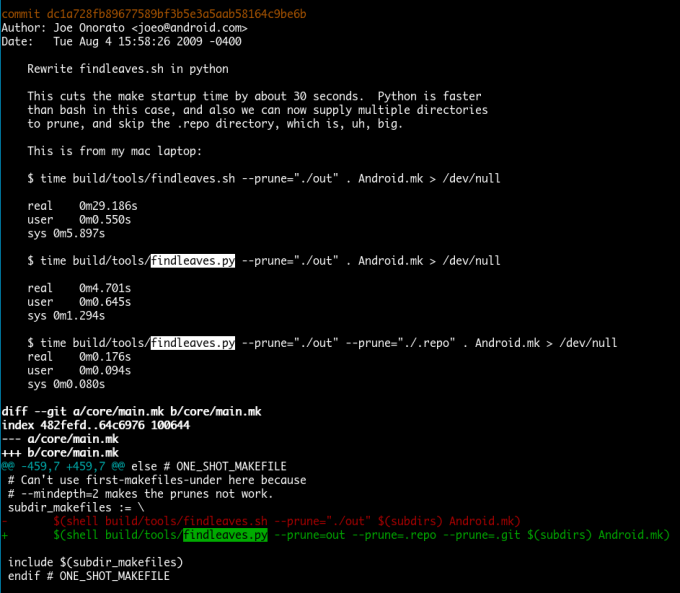
# Can't use first-makefiles-under here because
# --mindepth=2 makes the prunes not work.
subdir_makefiles := \
$(shell build/tools/findleaves.py --prune=$(OUT_DIR) --prune=.repo --prune=.git $(subdirs) Android.mk)

$(foreach mk, $(subdir_makefiles), $(info including $(mk) ...)$(eval include $(mk)))

endif # dont_bother

endif # ONE_SHOT_MAKEFILE

# Now with all Android.mks loaded we can do post cleaning steps.
include $(BUILD_SYSTEM)/post_clean.mk

ifeq ($(stash_product_vars),true)
$(call assert-product-vars, __STASHED)
endif

在真正的调用ONE_SHOT_MAKEFILE变量判断全编还是模块编译之前,我们还有一件事需要做:

暂存PRODUCT_*系列变量(stash-product-vars)

这项操作的用意很明显,我们对于Product级的配置已经结束,接下来加载的模块级别的配置是不能影响干扰到Product的相关配置,所以我们需要暂存变量,来方便后边比对是否修改了这些变量(assert-product-vars)

从这个操作我们也可以看出,Android编译系统对于Product配置在加载模块配置文件Android.mk文件之前就已经结束,从include文件顺序表中我们可以看到也就是在lunch的全部声明周期做完了Product的配置的加载,这里我们之所以不说是完成配置,而是完成加载,是因为对于PRODUCT_COPY_FILES这个变量我们还有操作需要处理,这块内容我们会在后序的文章中说明

接下来我们又遇到一个新的关键字TAG,如果编写过模块代码,那么对这个TAG应该不陌生,常用的定义有user,eng,tests,optional等,你可以指定对应的TAG,使得它在指定的编译类型中生效

这里使用一个get-tagged-modules函数来根据我们当前的编译的varient来挑选出合适的模块加入待编译列表

了解这个函数之前,我们需要知道传入的参数ALL_MODULE_TAGS的作用是什么

我们之前在解析各编译文件的作用时曾经提到过,envsetup.mk的作用主要是定义一些编译系统需要用到的宏,而definitions.mk文件则是用来定义一些公有的函数,这些公有函数主要用在模块编译规则文件Android.mk的编写,所以在遇到ALL_MODULE_TAGS这个变量,我们首先想到的就是去definitions.mk文件中查看,我们发现
definitions.mk中定义了ALL_MODULE_TAGS以及操作这个变量的相关函数,但是真正的为这个变量赋值的操作发生在base_rules.mk中,那么这个base_rules.mk与definitions.mk之间是什么关系呢?

一个Android.mk的示例

我们选择一个Android.mk来看看include之后发生了什么
示例Android.mk文件内容:

1
2
3
4
5
6
7
8
9
10
11
12
13
14
15
16
LOCAL_PATH:= $(call my-dir)

include $(CLEAR_VARS)

LOCAL_MODULE_TAGS := optional

LOCAL_SRC_FILES := \
$(call all-java-files-under, src)

LOCAL_PACKAGE_NAME := Nfc

LOCAL_JNI_SHARED_LIBRARIES := libnfc_mt6605_jni libmtknfc_dynamic_load_jni

LOCAL_PROGUARD_ENABLED := disabled

include $(BUILD_PACKAGE)

以上文件是一个NFC模块的Android.mk文件,我们从前边运行mm的流程可以得知,如果我们在NFC模块规则文件Android.mk文件所在的目录下运行mm,实际执行的操作是找到这个Android.mk文件,并将这个文件赋值给ONE_SHOT_MAKEFILE,然后在main.mk文件中加载进来,也就是我们会在main.mk文件中依次执行以上文件的内容:

  • 使用$(CLEAR_VARS)清零各变量
  • 定义几个以LOCAL_*开头的变量
  • 加载一个对应的编译规则文件$(BUILD_PACKAGE)

我们就以这个文件为例,来解析一下一般Android.mk文件加载的流程:
首先$(CLEAR_VARS)对应的是一个makefile文件clear_vars.mk,内容是对各个LOCAL_*变量的清零操作,这个宏的定义是在config.mk文件中,也就是在加载模块规则文件Android.mk文件之前

然后$(BUILD_PACKAGE)也是一个makefile文件package.mk,内容是关于对一个package编译的规则,Android编译系统定义了一系列的宏来将编译各种类型模块的规则打包,我们只需要在每个模块定义的最后引用就可以

了解以上两点,我们就可以使用之前分析make命令运行流程的方法来分析这个示例文件被include到main.mk之后的执行过程,以下是include Android.mk文件之后的include文件顺序:

1
2
3
4
5
6
7
8
9
10
11
12
13
14
15
16
17
18
19
20
21
22
23
24
25
26
27
28
29
30
#模块编译时的include顺序,以package.mk为例
config.mk (
62-97: BUILD_SYSTEM_INTERNAL_FILE (
CLEAR_VARS:clear_vars.mk
......
BUILD_STATIC_LIBRARY:static_library.mk
BUILD_SHARED_LIBRARY:shared_library.mk
BUILD_PACKAGE:package.mk (
6:include multilib.mk
53:include module_arch_supported.mk
55:include package_internal.mk (
204:include android_manifest.mk
207:include java.mk (
307:include base_rules.mk (
165:include configure_module_stem.mk
688:include $(BUILD_NOTICE_FILE)
)
314:include dex_preopt_odex_install.mk
)
356:include install_jni_libs.mk (
81:include install_jni_libs_internal.mk
)
)
)
BUILD_PHONY_PACKAGE:phone_package.mk
......
BUILD_PREBUILT:prebuilt.mk
......
)
)

从以上的include顺序图中,我们可以很清晰的发现base_rulse.mk的身影,这里我们只关心ALL_MODULE_TAGS,所以直接来看base_rules.mk文件中对这个变量的处理:

1
2
3
4
5
6
7
8
9
10
11
12
13
14
15
16
17
18
19
20
21
22
23
24
25
26
27
28
my_module_tags := $(LOCAL_MODULE_TAGS)

LOCAL_UNINSTALLABLE_MODULE := $(strip $(LOCAL_UNINSTALLABLE_MODULE))
my_module_tags := $(sort $(my_module_tags))
ifeq (,$(my_module_tags))
my_module_tags := optional
endif

# User tags are not allowed anymore. Fail early because it will not be installed
# like it used to be.
ifneq ($(filter $(my_module_tags),user),)
$(warning *** Module name: $(LOCAL_MODULE))
$(warning *** Makefile location: $(LOCAL_MODULE_MAKEFILE))
$(warning * )
$(warning * Module is attempting to use the 'user' tag. This)
$(warning * used to cause the module to be installed automatically.)
$(warning * Now, the module must be listed in the PRODUCT_PACKAGES)
$(warning * section of a product makefile to have it installed.)
$(warning * )
$(error user tag detected on module.)
endif

# Only the tags mentioned in this test are expected to be set by module
# makefiles. Anything else is either a typo or a source of unexpected
# behaviors.
ifneq ($(filter-out debug eng tests optional samples,$(my_module_tags)),)
$(warning unusual tags $(my_module_tags) on $(LOCAL_MODULE) at $(LOCAL_PATH))
endif

从上到下,依次说明了这几件事:

  • 如果LOCAL_MODULE_TAG未定义,那么默认使用optional
  • user这个TAG已经废弃,如果需要定义这个TAG,可以将其加入到PRODUCT_PACKAGES变量中
  • TAG只能是debugengtestsoptionalsamples这几个

我们在这里拿到tag之后,就需要对其进行处理:

1
2
3
4
5
6
7
8
9
10
# Keep track of all the tags we've seen.
ALL_MODULE_TAGS := $(sort $(ALL_MODULE_TAGS) $(my_module_tags))

# Add this module to the tag list of each specified tag.
# Don't use "+=". If the variable hasn't been set with ":=",
# it will default to recursive expansion.
$(foreach tag,$(my_module_tags),\
$(eval ALL_MODULE_TAGS.$(tag) := \
$(ALL_MODULE_TAGS.$(tag)) \
$(LOCAL_INSTALLED_MODULE)))

这个示例中Android.mk只定义了一个模块,所以这里的ALL_MODULE_TAGS就是Android.mk定义的LOCAL_MODULTE_TAG,如果是多个模块,这里就是多个模块的综合
然后使用不同的TAG后缀,将对应TAG的模块赋值给ALL_MODULE_TAGS.$(tag),这里模块只有一个,所以其值也是唯一,这样对应TAG的模块我们就可以拿到了

我们回过头继续看CUSTOM_MODULE的值是需要get-tagged-modules取出来的,我们来看这个函数:

1
2
3
4
5
6
7
8
9
10
11
12
13
14
15
16
17
18
19
20
21
22
23
24
define modules-for-tag-list
$(sort $(foreach tag,$(1),$(ALL_MODULE_TAGS.$(tag))))
endef

# Same as modules-for-tag-list, but operates on
# ALL_MODULE_NAME_TAGS.
# $(1): tag list
define module-names-for-tag-list
$(sort $(foreach tag,$(1),$(ALL_MODULE_NAME_TAGS.$(tag))))
endef

# Given an accept and reject list, find the matching
# set of targets. If a target has multiple tags and
# any of them are rejected, the target is rejected.
# Reject overrides accept.
# $(1): list of tags to accept
# $(2): list of tags to reject
#TODO(dbort): do $(if $(strip $(1)),$(1),$(ALL_MODULE_TAGS))
#TODO(jbq): as of 20100106 nobody uses the second parameter
define get-tagged-modules
$(filter-out \
$(call modules-for-tag-list,$(2)), \
$(call modules-for-tag-list,$(1)))
endef

get-tagged-modules有两个参数,第一个参数对应的是我们想要取出的模块的tag,第二个参数对应我们不想取出的模块对应的tag,获取CUSTOM_MODULE时,只传入了我们想要取出的模块tag,所以我们我们看到,对于传入的要取出的对应tag的模块,我们只是从ALL_MODULE_TAGS对应tag后缀中取出即可

虽然一个简单的模块编译规则绕了这么一大圈,但是这只是对于单个模块而言,这套模块编译系统的强大之处对于多个模块编译才能真正体现出来,也就是我们进行全编的时候才会见识到它真正的威力

ALL_DEFAULT_INSTALLED_MODULES
挑选完模块之后,我们就看到前边解析mm时要到的打印目标模块安装路径的那个target,然后模块的单编也就完成了参数的传入

回过头来我们看看全编过程对Android.mk文件的处理,当include全部的Android.mk之后,我们会发现所有的模块文件都各自被这两条语句包括着:

1
2
3
4
5
6
7

include $(CLEAR_VARS)

......

include $(BUILD_PACKAGE)

我们前边已经讲到过CLEAR_VARS就是一个全部LOCAL_*变量的清零操作的mk合集,而BUILD_*这类型的文件定义了各种类型的模块的编译规则  

这里还有一个dont_bother的问题,dont_bother的出现,是因为Android编译系统定义了一些特殊的目标,在编译这些目标时,不需要加载Android.mk文件,具体的定义在build/core/main.mk

1
2
3
4
5
6
7
8
9
10
11
12
13
14
15
# These goals don't need to collect and include Android.mks/CleanSpec.mks
# in the source tree.
dont_bother_goals := clean clobber dataclean installclean \
help out \
snod systemimage-nodeps \
stnod systemtarball-nodeps \
userdataimage-nodeps userdatatarball-nodeps \
cacheimage-nodeps \
vendorimage-nodeps \
ramdisk-nodeps \
bootimage-nodeps

ifneq ($(filter $(dont_bother_goals), $(MAKECMDGOALS)),)
dont_bother := true
endif

包括clean, help, 以及一些image的打包等,这些目标都是独立的,不需要依赖,因此对于代码相关的模块是不需要参与编译的

找到系统所有的Android.mk

对于全编过程中所有模块文件的加载我们用到了findleaves.py

1
2
3
4
5
6
7
8
9
10
11
12
13
14
15
16
17
18
19
20
21
22
23
24
25
26
27
28
29
30
31
32
33
34
35
36
37
38
39
40
41
42
43
44
45
46
47
48
49
50
51
52
53
54
55
56
57
58
59
60
61
62
63
64
65
66
67
68
69
70
71
72
73
74
75
76
import os
import sys

def perform_find(mindepth, prune, dirlist, filename):
result = []
pruneleaves = set(map(lambda x: os.path.split(x)[1], prune))
for rootdir in dirlist:
rootdepth = rootdir.count("/")
for root, dirs, files in os.walk(rootdir, followlinks=True):
# prune
check_prune = False
for d in dirs:
if d in pruneleaves:
check_prune = True
break
if check_prune:
i = 0
while i < len(dirs):
if dirs[i] in prune:
del dirs[i]
else:
i += 1
# mindepth
if mindepth > 0:
depth = 1 + root.count("/") - rootdepth
if depth < mindepth:
continue
# match
if filename in files:
result.append(os.path.join(root, filename))
del dirs[:]
return result

def usage():
sys.stderr.write("""Usage: %(progName)s [<options>] <dirlist> <filename>
Options:
--mindepth=<mindepth>
Both behave in the same way as their find(1) equivalents.
--prune=<dirname>
Avoids returning results from inside any directory called <dirname>
(e.g., "*/out/*"). May be used multiple times.
""" % {
"progName": os.path.split(sys.argv[0])[1],
})
sys.exit(1)

def main(argv):
mindepth = -1
prune = []
i=1
while i<len(argv) and len(argv[i])>2 and argv[i][0:2] == "--":
arg = argv[i]
if arg.startswith("--mindepth="):
try:
mindepth = int(arg[len("--mindepth="):])
except ValueError:
usage()
elif arg.startswith("--prune="):
p = arg[len("--prune="):]
if len(p) == 0:
usage()
prune.append(p)
else:
usage()
i += 1
if len(argv)-i < 2: # need both <dirlist> and <filename>
usage()
dirlist = argv[i:-1]
filename = argv[-1]
results = list(set(perform_find(mindepth, prune, dirlist, filename)))
results.sort()
for r in results:
print r

if __name__ == "__main__":
main(sys.argv)

虽然函数内容很少,但是我们可以从中看出一些细节实现,所以我们在这里简单分析一下:
首先来看使用方法,就是定义的函数usage(),我们从

Usage: %(progName)s [<options>] <dirlist> <filename>

可以看出函数后加两个可选参数和两个不可省略参数,我们分开来看他们的规则

  1. 可选参数
    • –mindepth:相对于查找目录的最浅深度,如果没有达到,不会查找filename,可以有多个参数,取最后一个定义
    • –prune:略过查找的目录,可以定义多个目录
  2. 不可省略参数
    • dirlist:要执行查找操作的目录列表,需要有1个或多个参数
    • filename:参数唯一,需要执行查找的文件名

Android编译系统在这里使用的命令是

build/tools/findleaves.py --prune=$(OUT_DIR) --prune=.repo --prune=.git $(subdirs) Android.mk

也就是排除了out,.repo,.git三个目录,在根目录下查找Android.mk文件

main函数为入口函数,在perform_find函数之前主要是对参数进行处理,将需要排除的目录放入prune数组中,执行实际查找的函数主要在perform_find中,我们来看

def perform_find(mindepth, prune, dirlist, filename):
  result = []
  pruneleaves = set(map(lambda x: os.path.split(x)[1], prune))
  for rootdir in dirlist:
    rootdepth = rootdir.count("/")
    for root, dirs, files in os.walk(rootdir, followlinks=True):
      # prune
      check_prune = False
      for d in dirs:
        if d in pruneleaves:
          check_prune = True
          break
      if check_prune:
        i = 0
        while i < len(dirs):
          if dirs[i] in prune:
            del dirs[i]
          else:
            i += 1
      # mindepth
      if mindepth > 0:
        depth = 1 + root.count("/") - rootdepth
        if depth < mindepth:
          continue
      # match
      if filename in files:
        result.append(os.path.join(root, filename))
        del dirs[:]
  return result

这个函数主要做了以下几件事:

  • 首先记录了目录深度,用于在后边判断是否达到最浅目录深度(mindepth)
  • 然后遍历传入的目录,也就是源码根目录
  • 检查是否需要在当前目录略过指定的目录(加快搜索速度)
  • 如果检查到需要略过的目录,删掉当前目录下的子目录中所有指定的目录
  • 判断是否达到最浅的搜索深度
  • 如果文件名匹配,将它放到reslut数组中
  • 返回查找到的所有的Android.mk

函数很简单,但是需要注意两点:

  • 如果最小目录深度mindepth没有达到,那么不会匹配当前目录的文件,直到达到目录深度才会执行开始匹配
  • 如果当前文件夹下匹配到了Android.mk,那么就清空子目录列表,也就是停止继续向下查找

以上两点是很重要的,第一点可以让我们可以自由的控制从哪个目录深度开始查找,第二点可以让我们自由的拓展目录的深度与广度,可以自由的控制深度目录下的模块的编译与否,Android编译系统提供了两个函数来搭配这种查找方式all-makefiles-underfirst-makefiles-under

一个小插曲

脚本解析完了,这里还有一个小插曲说明一下:
findleaves.py是一个python脚本,这点我们已经了解,你可能会想到为什么不是一个shell脚本,额,没错,你想的没错,这之前确实是一个bash脚本,09年的8月份被替换掉了,google支持python的时间还真是久远,原因是因为可以大大缩短解析的时间

下边作者当初的提交,让我们来看看来究竟比bash强大在什么地方
使用python脚本替换bash脚本的git变更提交

作者在提交里说明,使用python重写的原因有两个

  • 可以使用多重prune来排除目录
  • 有效的缩短查找时间

确实,从作者的提交记录来看,从30秒缩减到不到1秒,确实提升很多,我们看到这里已对python顶礼膜拜,敬仰之情滔滔不绝

然并xxx

其实shell脚本该实现的也都已经实现,并且在搜索性能上不仅不差python,还更胜一筹,下图是实际的对比结果

实际比对结果

作者当初选择python重写,一者可能是因为喜爱python,另一个原因可能是他根本不会用那个shell脚本….

好了,小插曲过后,我们回过头来继续研究,我们读了两个脚本之后,也明白了Android.mk文件的搜寻条件,简而言之:
从$(subdirs)也就是源码根目录开始搜索,排除.repo,out和.git目录,搜索各个目录下的Android.mk并打印,关于其中的查找规则,前边已经说明,我们不再赘述

结束语

至此,关于Android.mk相关的内容也已经解析完毕,对于模块编译的内容的解析可能不是那么深,因为模块编译有单独的一套规则,且相对独立,在一般的系统开发中的出问题的可能性比较小,所以对于这方面待日后遇到问题再来详细补充

Android编译系统分析之几个关键点(三)

http://www.0xforee.top/2016/01/08/android-build-systemui-keypoint-third/

作者

0xforee

发布于

2016-01-08

更新于

2016-01-11

许可协议


欢迎关注我的公众号 0xforee,第一时间获取更多有价值的思考

评论